How To Do a Lash Lift with LAshX X DollyLash

Adding Lash Lifts to your salon menu is as easy as 1-2-3
Lash lifts are becoming more and more popular and they are a great alternative for clients who want a look that is more natural than lash extensions. Maybe your guest has great lashes but they point down and aren't visible. Lash Lifts give the natural lashes a natural curve up, like using a lash curler, without the daily work. They utilize a silicone shape as apposed to perms that are done on a rod. The result of this is a more natural curve, instead of a kinked curl. It is beautiful. A lash lift when done correctly should last about 3 months, where as perms only last about 1 month. Lash Lifts are superior to perms for prelash extension appointments too, because the natural curve they give is much easier to apply lash extensions too than the tight curl of the lash perm.
To watch our Youtube channel and see more How Tos Click Here
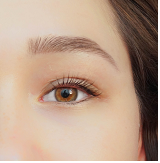
Here our lovely model, just graduated from high school and was looking for a natural way to enhance her eyes. Her mom is a lash extension client of mine. Check out her before and after!


Supplies Needed:
Instructions:
1. Cover lower lashes with gel pad.
2. Brush top lashes straight down
3. Apply silicone lift in small, medium, or large depending on the amount of desired curl and the natural length of your guest's lashes. You will use glue provided in kit to attach the silicone shape at the bottom of the lid, as close to the lash line as possible. If you do not get close here, you will not get a nice curl. Glue in place with provided adhesive. (Don't worry it will come right off with oil).
4. Slowly start using the same adhesive provided to glue the lashes into position on the silicone shape. Use the micro swabs to ensure the lashes are not touching and are perfectly straight and in position. How ever the lashes are placed and glued now is how they will remain after the service so take your time getting perfection.

5. Once the lashes are all in place you will apply lotion #1 in the package. The pink Perm packet. Use an entire packet for both eyes. Apply with a brush, q-tips or micro swabs, carefully coating each lash.
6. Let the solution set for 12-15 minutes. For thicker hair you will leave this on for 15 minutes, for clients with fine hair start with 12 minutes. I always like to be conservative and do less time on a clients first visit. This is to make sure I do not risk over processing. Note your times and make adjustments during the next appointment as needed.
7. Remove all of the pink perm solution with q-tips or micro swabs. Do not use water. Carefully make sure all of the solution is removed. Do not reuse q-tips or swabs. Toss them out.

8. Apply blue setting lotion for the same amount of time as the last solution. Make sure to evenly coat all of the lashes with micro swabs or q-tips.
9. Carefully remove all of the second solution, leaving lashes glued in place on silicone lift.
**Now is the time you would tint if you are going to tint. Replace gel pads with a clean pair, placing the gel pad under lower lashes now. Do lash tint making sure to tint lower an upper lashes as directed. Remove tint.
10. Remove glue, lashes and silicone lifts with Nourishing lotion in packet #3. I use a q-tip for this and gently remove all glue residue. Clean the eye area with protein remover wipe, but leave the lashes with the oil on them. I like to brush them out with a mascara wand and hit them with the fan to fluff them out for the client.


Comments
Comments